2.11 Bins, Subclips & Markers Creation
Export rough edits to Davinci, Premiere Pro or Final Cut. It's like creating an album.
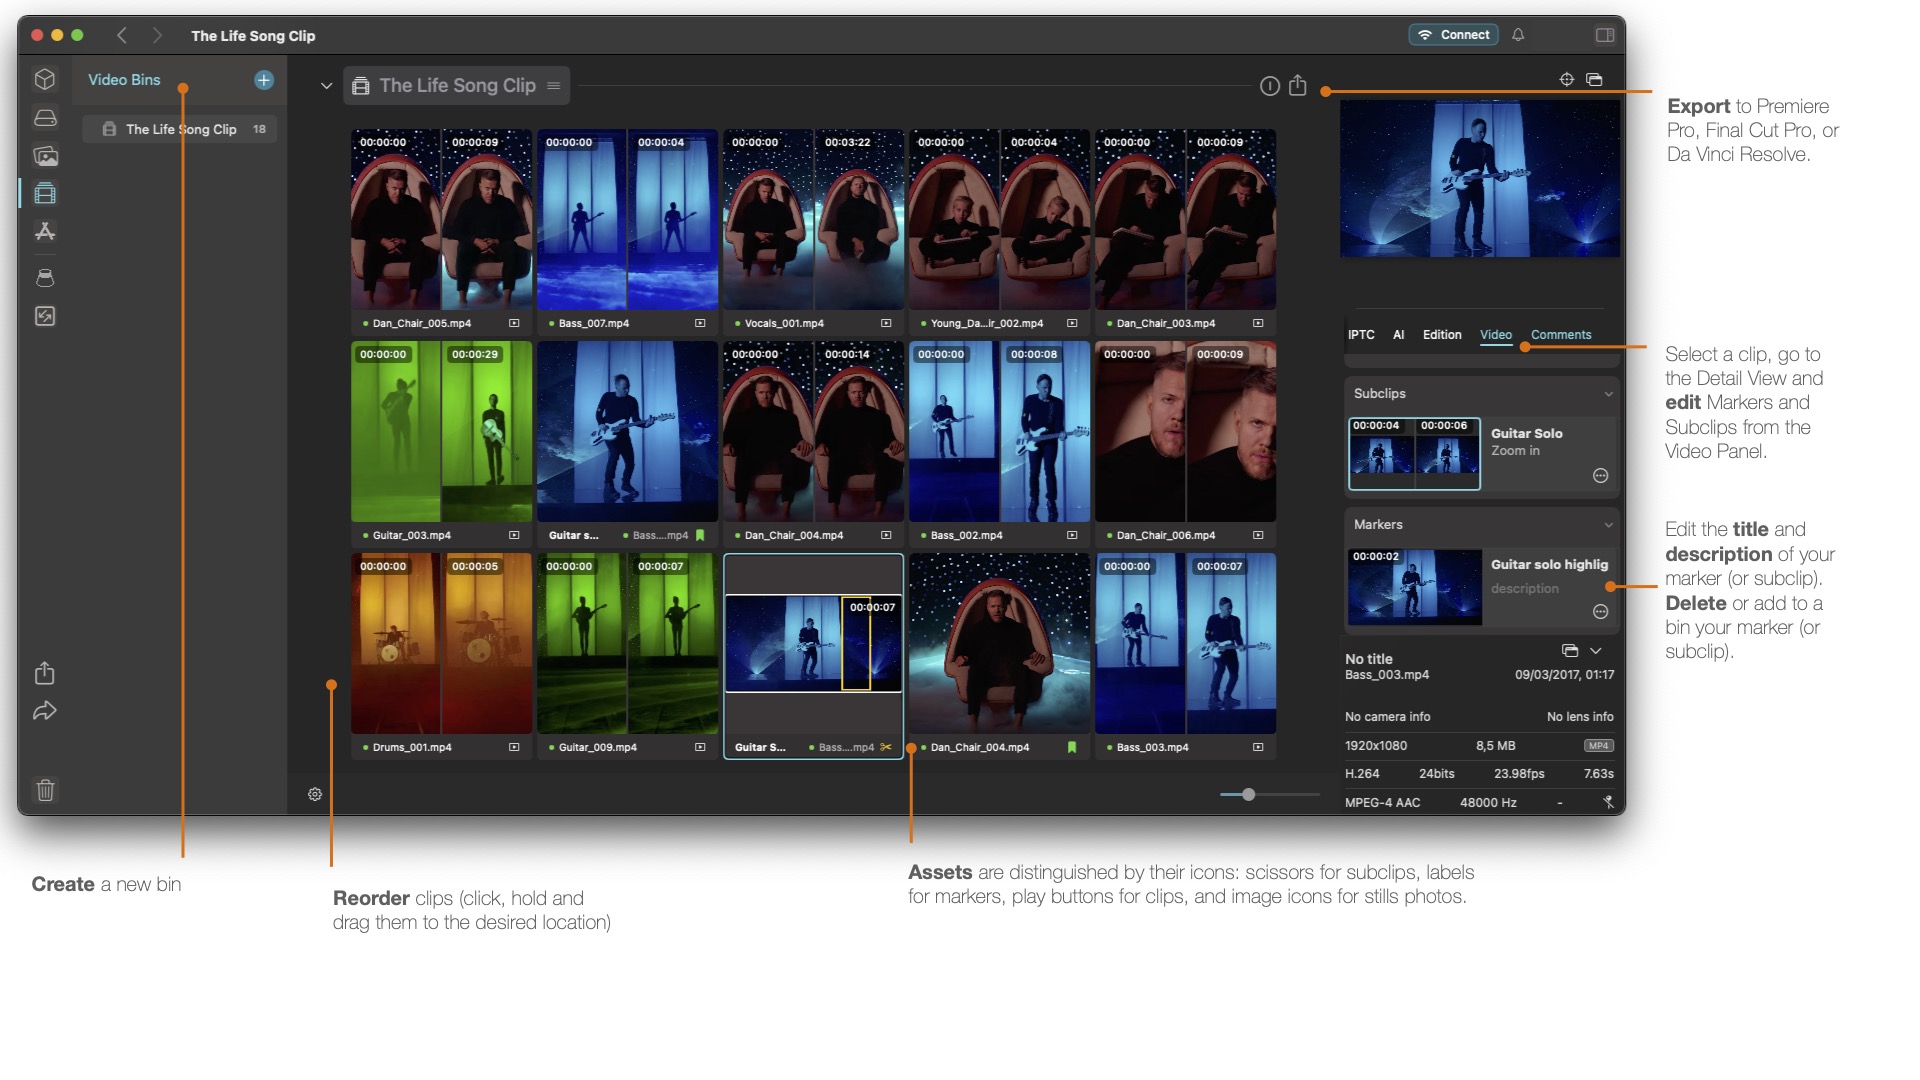
2.11.1 Using Video Bins
Video Bins in Peakto work much like those you find in video editing software. They allow you to organize, review, and prepare your video assets efficiently before editing.
To create a video bin, go to the left sidebar and click the Video icon to open the Bin panel. Then click the ‘+’ button.
You can also create a new bin by selecting File > New Bin.
Once created, you can add images, videos, subclips, or markers into the bin. A video bin functions similarly to an “Album,” except that its items can be organized, reorganized, rearranged, and ordered precisely to suit your needs.
All the videos in a bin can be reviewed thanks to a scruber.
If you click on an item, such as a subclip, you will see the original clip along with a visual indicator—a rectangular overlay—showing exactly which portion of the original footage the subclip corresponds to. After selecting a subclip from your video bin, the right-hand menu will display all other subclips associated with the same source clip. From there, you can easily select additional subclips and drag them into the bin.
You can also right‑click any bin item and choose Reveal in Grid to locate it among your wider catalog.
To reorder clips, click and drag them to the desired location within the bin.
2.11.2 Creating Subclips
Subclips allow you to isolate and save a specific portion of a longer clip for quick reference and assembly in your projects.
To create a subclip, select a clip and open it in the Detail View. You have three ways to set your In and Out points:
• From the player: Right-click the video and choose Create Subclip from the context menu. You can also use shortcuts I for In Point, O for out Point, Y to create the subclip, U to create marker.
• From the contact sheet: Right-click on the frame where you want to set your In Point and choose Create In Point. Then, right-click another frame to set your Out Point and choose Create Out Point. Once both points are defined, right-click again and select Create Subclip.
• From the menu: Go to Menu > Image > Set In Point / Set Out Point / Create Subclip.
Each subclip you create appears in the Subclips list in the Inspector, marked by a yellow rectangle showing the exact segment of the original clip it contains.
You can rename subclips and adjust their trim points directly in the Inspector. You can also reveal subclips in the Grid View to see them alongside other nearby items for better context.
2.11.3 Creating Markers
Markers help you flag frames for notes, chapter breaks, or client feedback. Pause your clip at the desired frame, then right‑click and select Create Marker (or press U). In the Inspector, add a title and description to keep your notes organized.
Each marker you place appears in the Markers list in the inspector and is represented by a green line at its precise position, making it easy to jump between key moments or reveal its location in the grid view.
Click the three-dot menu to add a marker to a bin or delete an existing marker.
NOTE: Thanks to these icons you can see at a glance if an item is an image (image icon), subclip (scissors), or marker ( marker icon), and both markers and subclips can be edited directly in the inspector.
2.11.4 Exporting Video Bins
Once you have created your bin, you can click on the export icon in the top right corner and choose your preferred option:
- Define the export format (Final Cut Pro X/11 V1.11; Final Cut Pro 7 XML V5)
- Export directly to your video editing software: DaVinci, Final Cut Pro, or Premiere Pro.
This will create a file that can be imported as a timeline into those applications.
Once exported, it will recreate the timeline and you will find all the clips and markers from your bin in the correct order, with references to the files in their original locations.
Related Articles
How to Manage Folders in Peakto
1) Import your photo / video folders ● Open Peakto ● Add a source: ○ Click the + in the left sidebar ○ Or go to File > Attach folder ○ Or simply drag and drop your folder into Peakto ● Peakto analyzes the folder (metadata, image content, faces, audio ...1.1 Peakto’s interface
Peakto’s Interface Peakto offers a flexible interface that adapts to what you’re doing with your media, showing only the elements you need. The main interface is composed of the following: Navigation and Quick Actions (top of the left sidebar) : ...When I attempt to set up an account to the desk using Safari, I get the message "Cookie is disabled in your browser. Please enable the cookie to continue."
Cyme Desk is based on Zoho Desk and unfortunately there is an incompatibility with Safari when creating the account. This bug seems to be related to the way Zoho Desk handles cookies. Despite numerous exchanges with their development teams, the ...2.13 Peakto Database Backup (beta)
Peakto introduces a backup feature (beta) designed to protect your valuable media metadata, ensuring that your annotations, faces, keywords, and albums are safe, even in the event of unforeseen issues. Storing All Metadata Automatic Metadata ...